Create a New Project
This guide walks you through the essential steps to create a project in the Data Catalog. Creating a project is simple and flexible and all users can create projects.
Tip
Keep in mind that you can update the project metadata at any time.
Step 2: Add a New Project
On the Project List page, click the Add a new project button located right below the Search bar.
Step 3: Fill in Project Metadata
Complete all the required fields marked with *:
Project Title (
*)Project Description (
*)Access Rights (
*)Principal Investigator (PI) (
*)LIMS (Benchling) project URL (must start with https://bright.benchling.com)
Tip
To find the Benchling project URL, log in to Benchling, open the Projects section in the left sidebar, and select the project you want.
Click the settings button ( ) next to the project name and choose Copy project link.
Final Step: Complete Project Creation
Click Create project at the bottom of the page to complete the process.
Project Creation
Note
Some fields on the project creation page are automatically generated by the system, such as Project Identifier, Date Created, Project Creator, Project Status, and Access Rights. Some of these fields cannot be edited.
Access Rights and Visibility
Projects have two access rights settings:
BRIGHT-visible:
Project metadata is visible (read-only) to all BRIGHT employees. However, visibility of datasets depends on each dataset’s individual access rights.
Restricted:
The project is completely hidden to all BRIGHT employees, except from users who have been explicitly granted permissions.
➣ By default, projects are set to BRIGHT-visible, but you can change the access rights when creating or editing a project.
Understanding how access rights affect visibility is important for collaboration:
Note
Users without assigned permissions (see: Manage Projects User Permissions) follow the project access rights:
→ For BRIGHT-visible projects: Metadata is visible (read-only) to all BRIGHT employees
→ For Restricted projects: Project is completely hidden
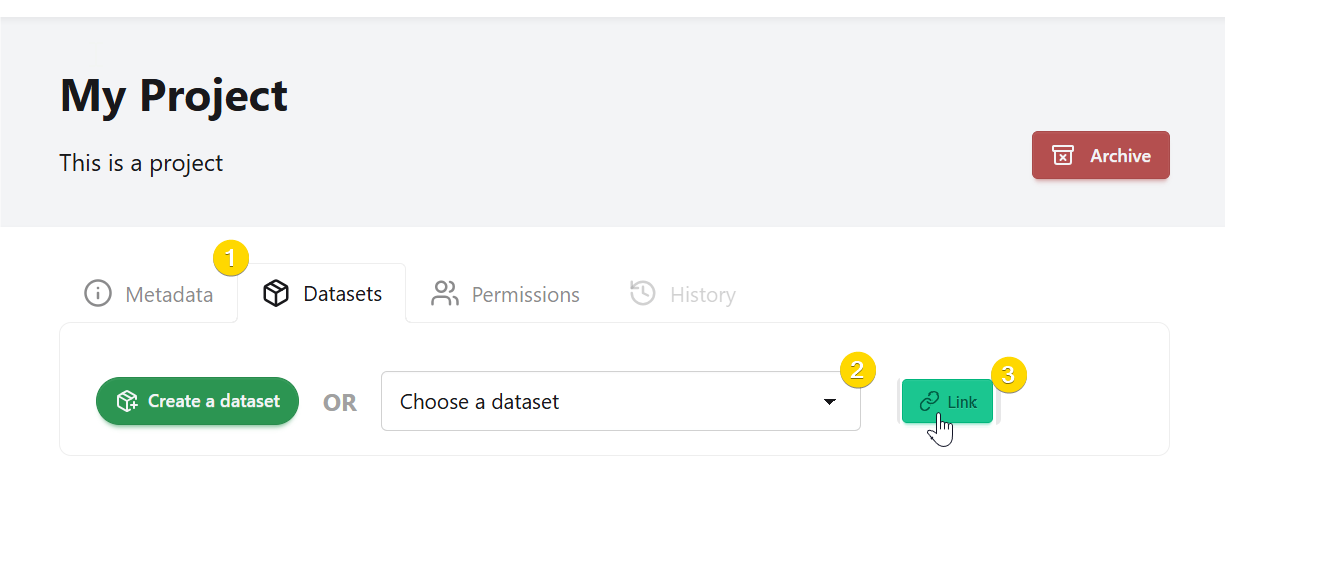
Add Datasets to Project
Once you have created the project, you can create a new dataset from the Datasets tab, and it will be automatically added to the project.
You can also add additional existing datasets from the same Datasets tab on the project home page. This helps you associate the project with other datasets that are relevant to your research.
To add another dataset to a project:
Click the
Datasetstab on the project home pageSelect the dataset you want to add from the list
Click
Linkto complete the process
To remove the relationship:
Click
Unlink, and the dataset will be removed
Note
To add a dataset to a project, two conditions must be met:
→ You must have the Can Add Datasets permission on the project you want to add the dataset to
→ You must have access to the dataset (either Bright-visible or through a dataset user permission, if it is restricted)
If either of these is missing, you will not be able to proceed.
Add Datasets to Project
Note
This relationship also appears under the Projects tab on the dataset home page.
API Availability
The actions described in this page can also be performed programmatically using our FastAPI. For more details, see the following endpoints in our API Reference: