Manage your Benchling Project
🎯 This guide will show you how to manage Benchling Projects to keep research data structured and accessible. It will aslo outline good practices to improve reusability of your data after your stay at DTU Biosustian.
What are Projects in Benchling?
Project folders (referred to as Projects in this guide) are key elements of data management in Benchling that provide a structure to the data registered in Benchling.
Each Project has its own Permission settings that allow the Project Admin to define who will be able to access the data inside the Project (the Project Collaborators). It is possible to grant access to:
a single user (e.g., a colleague)
an entire team (e.g., your research group)
Go to the section “Add and remove Collaborators” to learn how manage the Project permissions.
It is possible to further organize the data within the Project by creating Subfolders. In these folders you can store:
notebook entries
protocols
entities (e.g., plasmids, oligos, and DNA sequences)
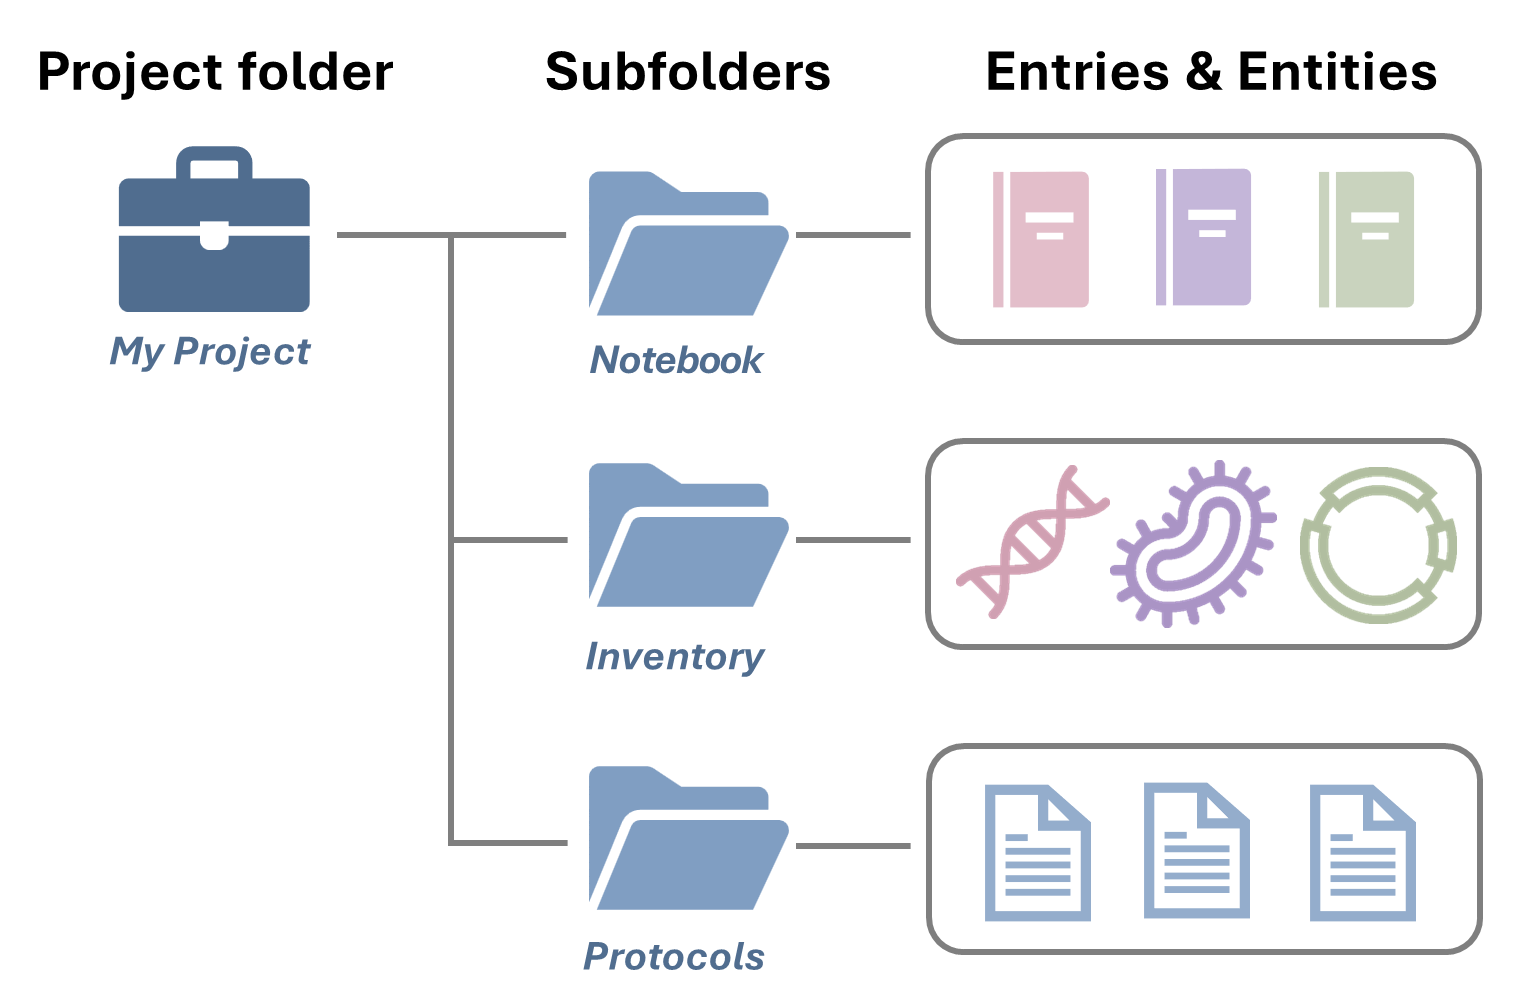
Example of the structure of a Project folder
ℹ️ Need a Training space?
If you want to try out some of Benchling’s functionalities, you can use the BRIGHT Training project folder for this purpose.
Create a Project (or use an existing one)
All users can create Projects in Benchling, but new Projects should be created when truly necessary, for example when starting a new research project with a specific set of collaborators.
Each team might have a different preference on how they want to handle their Projects:
Some teams create one Project for each team member
Some teams create one Project for each ongoing study
Recommendations
✅ Create one Project for each ongoing study, rather than for each team member.
Here are some of the benefits:
The entirety of the data related to that Project can be found in a single location, avoiding redundancy and data scattering across personal folders.
Easier permissions management
🔐 All the Collaborators can be added only once (and easily updated), and they will always be able to find and access newly created data, avoiding unnecessary emails and access requests.
✅ Whenever possible, add your (Benchling) Team as Collaborator to the Projects you create.
Here are some of the benefits:
Increased visibility of your data and its findability
Creation of a centralized list of your team’s Projects, accessible by you and your PI at any time.
📚 Access the full list of your team’s Projects using one of the Menus shown below:
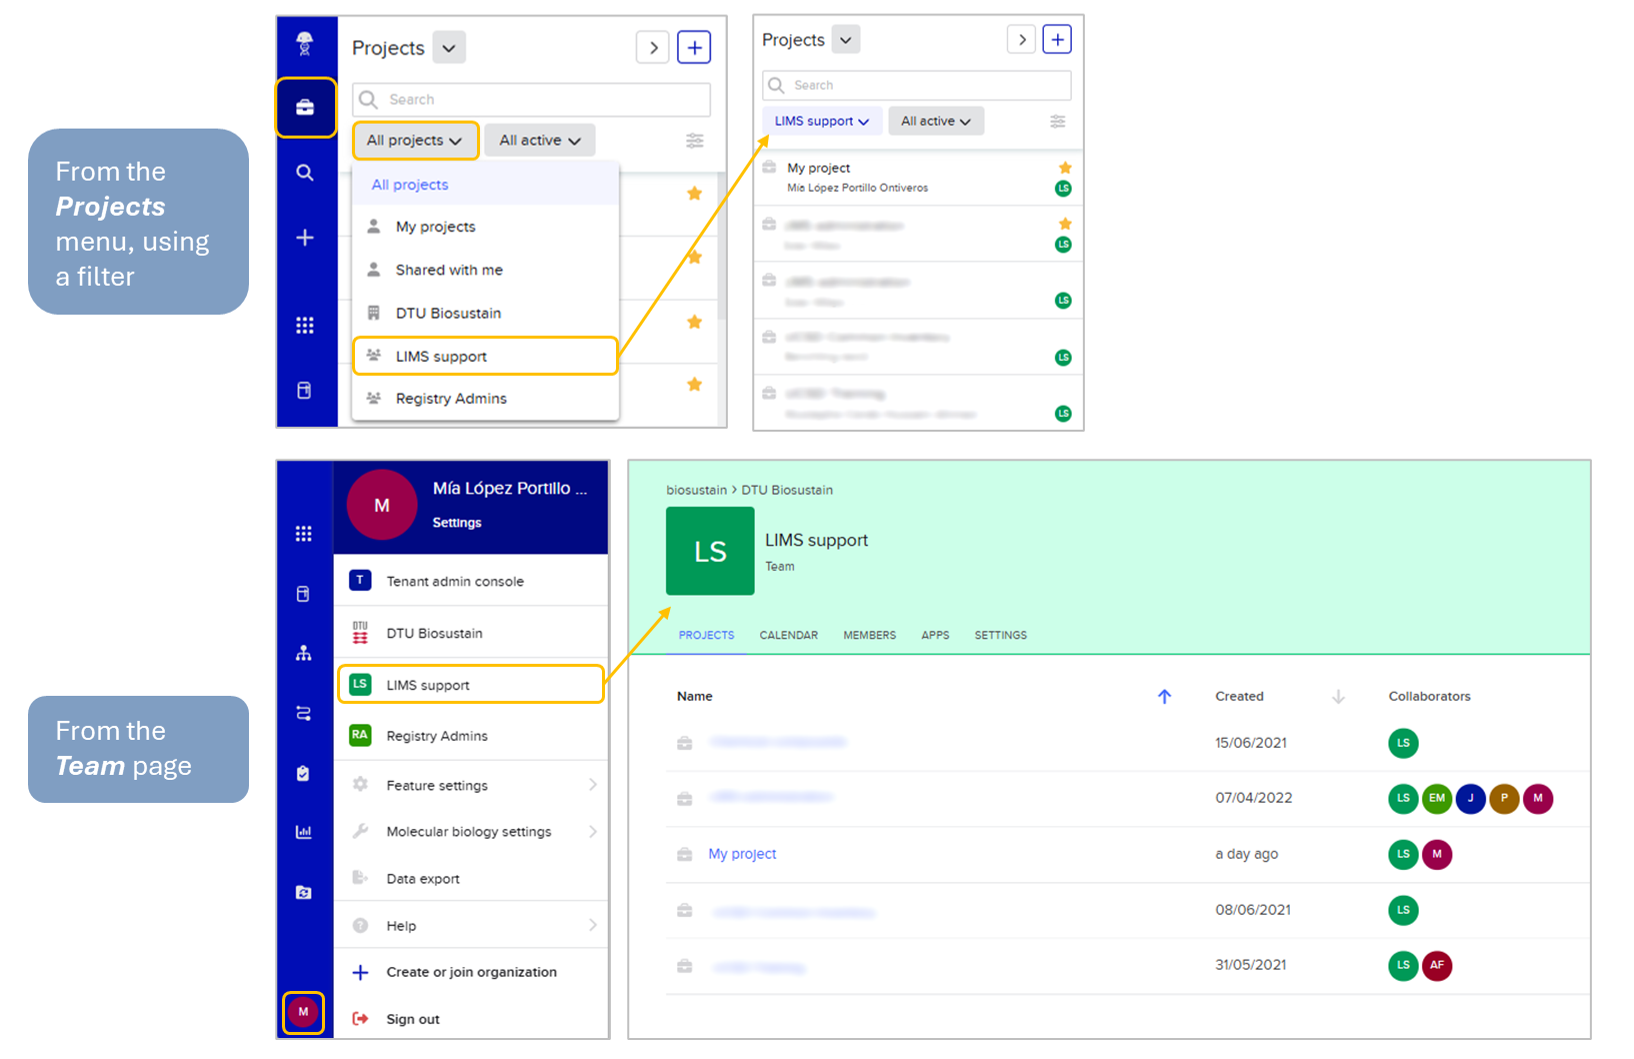
Different ways of having an overview of the Projects shared with your team
ℹ️ Sharing samples with the Analytics team
When submitting samples for the Analytics team, it is necessary to grant them “Write” permission to your folder. Many users choose to create dedicated Projects for this.
We recommend creating a single, team-wide folder to create samples for analysis.
✅ Manage team’s protocols and other shared data by creating a Team-level Project.
In addition to having single Projects for each ongoing study, many teams have found it useful to have a shared team Project folder to ease the process of sharing protocols, team guidelines and other commonly shared information that is useful to the whole team.
This Project should have your (Benchling) Team in the list of Collaborators.
All new employees added to the (Benchling) Team will automatically gain access to all protocols and relevant team-level information and data.
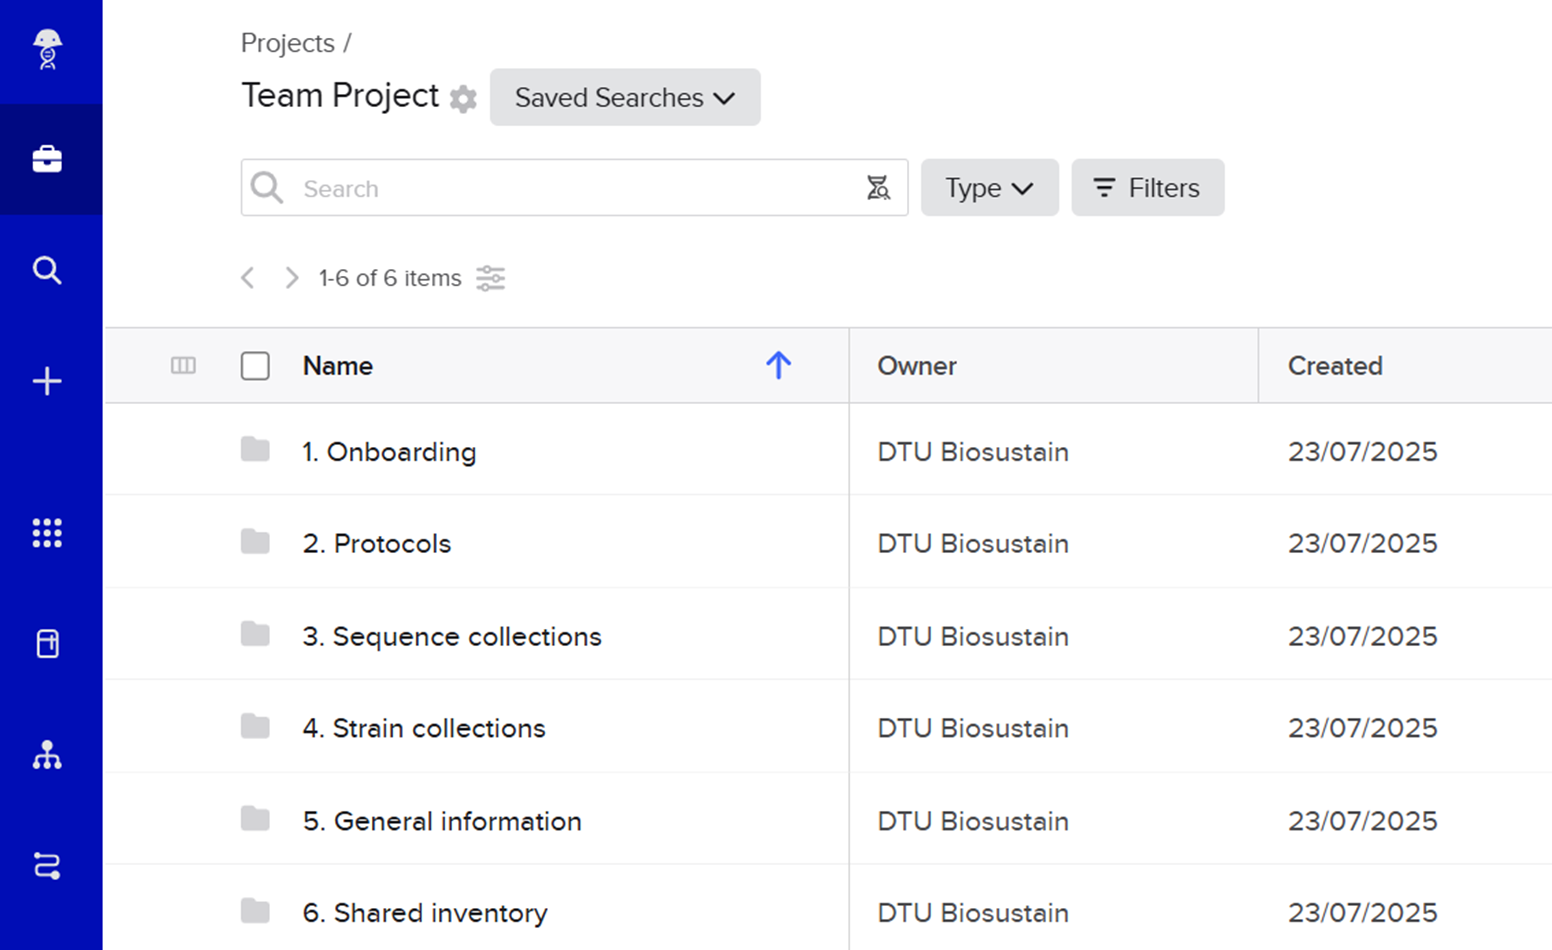
An example of a shared team Project folder
Add and remove Collaborators
Through the Manage access menu, you can define which users or teams can have access to your information, and what level of access each should have.
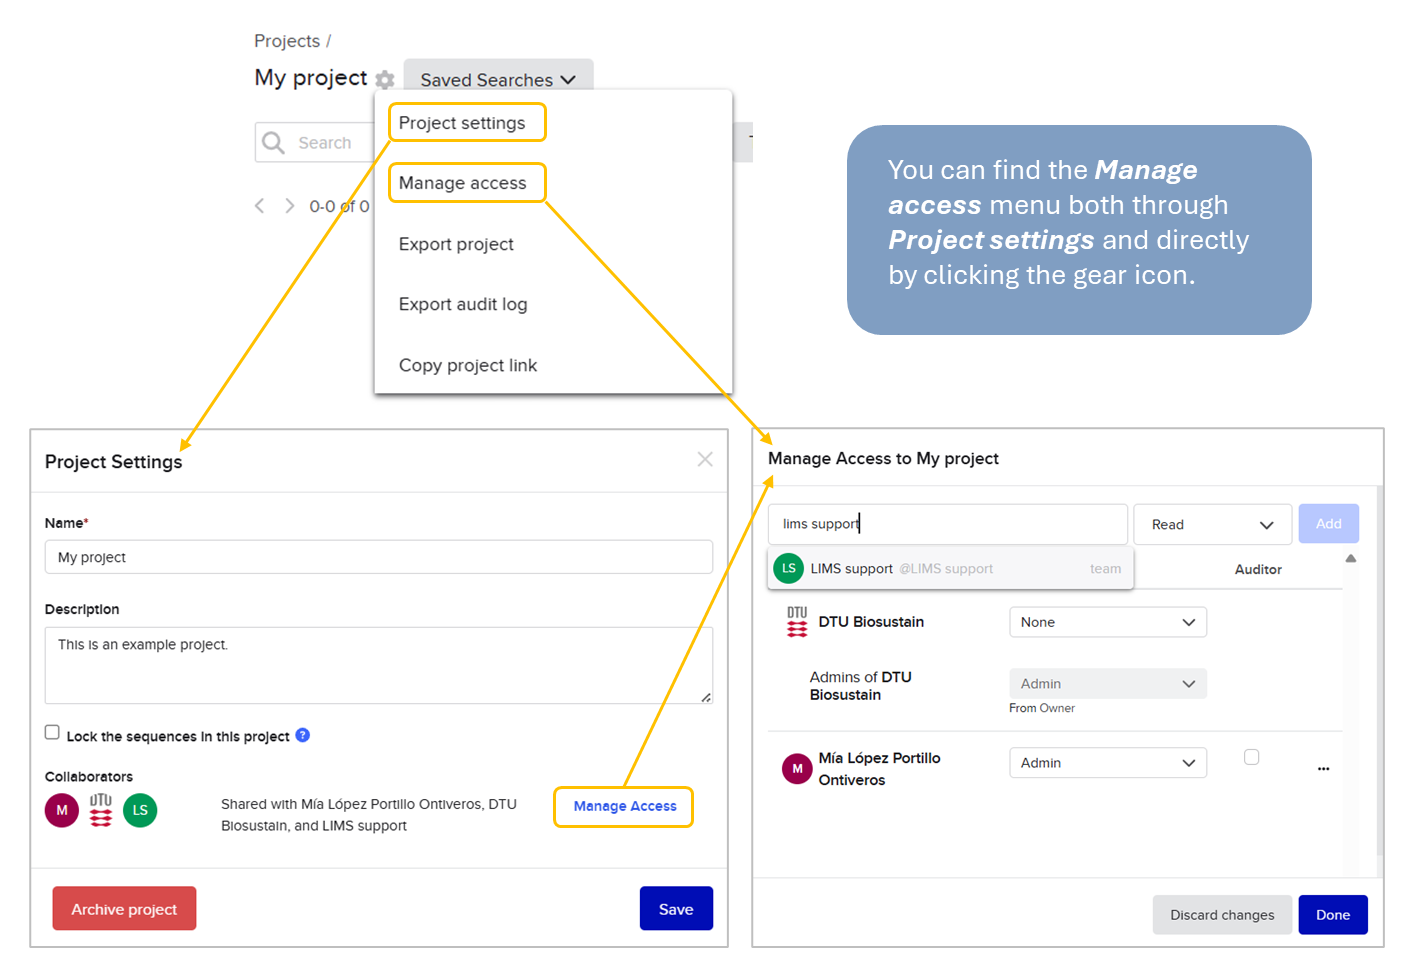
View of the Manage Access menu
Permission levels overview
The actions users with different levels of permissions can take are outlined below:
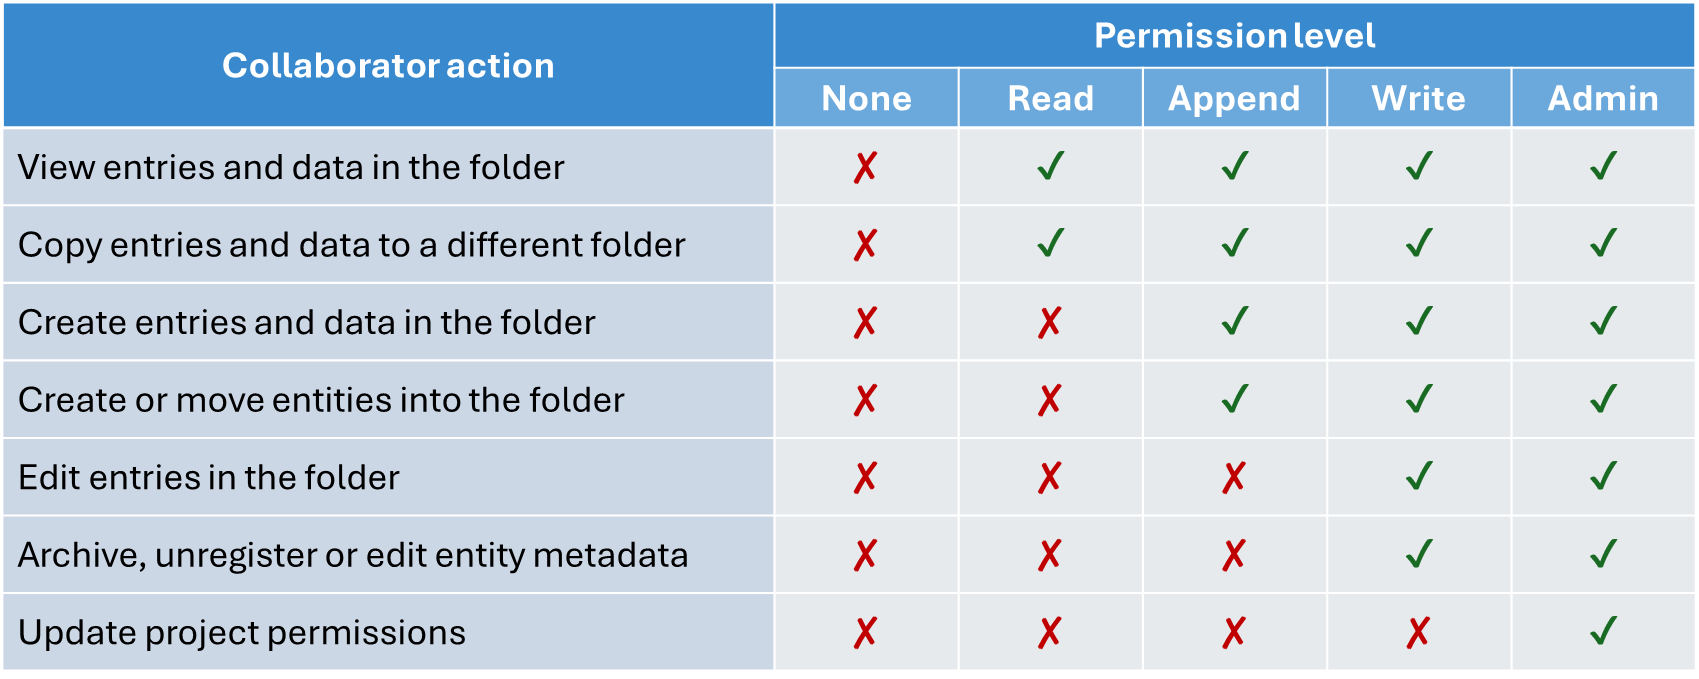
Note: Users with append permission may be able to create blank entries, but they will then not be able to edit them. This permission may only be useful to append already completed documents and entities that do not require further editing by the user with this level of permission.
Granting access to a Team: Admins vs. Members
You can also specify separate levels of access for members and admins of a team. This may be useful if you would like to ensure a link between your Project and your team, but you can’t share the data with the entire team yet.
To do this, locate the team you want to manage the permissions of in the Manage access menu of your Project, and follow these steps:
More options button (…) > Add admin member access policy > Select level of access for users and admins
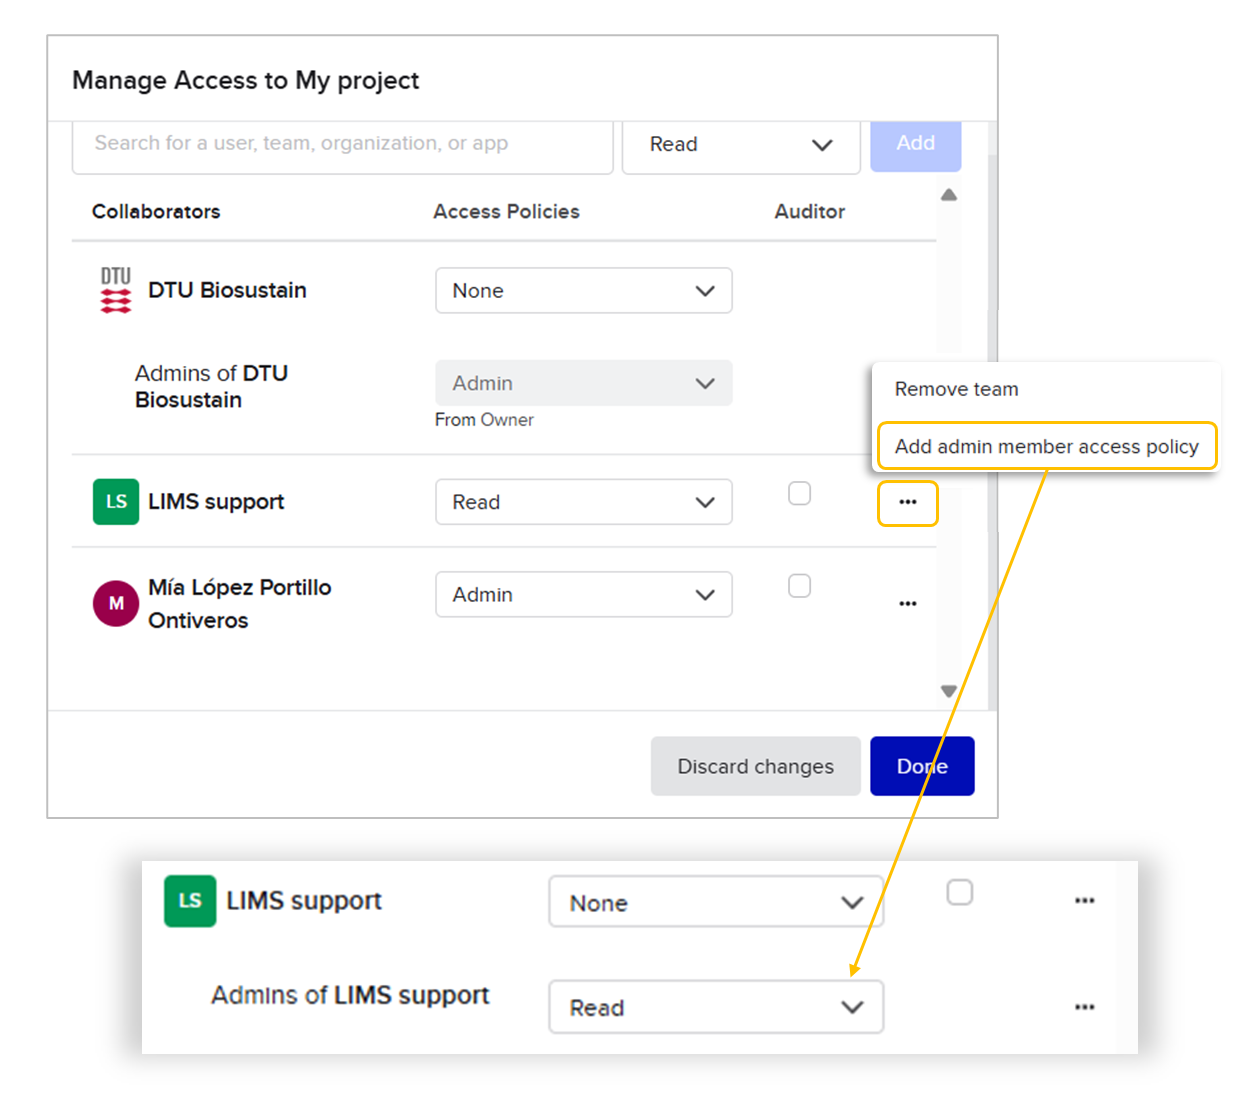
Setting an admin member access policy
Identify your data requirements
Throughout your stay at BRIGHT, it is good to keep in mind the purpose of the information you generate and store within Benchling, and how you (and others) will need it in the short, medium and long term. This information will determine how you register and structure your data in Benchling.
☑️ Checklist:
Some questions to guide you through the process of managing your data (both within and outside of Benchling) are:
- If external collaborators ask for some data after one year of running an experiment, can I find it easily?
- Can my colleagues understand my experiments and find their results?
- Is there an easy way to find items like strains or plasmids in the freezers?
- Can I know if someone has a plasmid I need without asking everyone?
- If I left right now, could people know where I left off and continue my work easily?
Additional tips for day-to-day usage
This section covers some suggestions for your day-to-day use of Projects in Benchling.
Requests for access
You may receive emails requesting access to your Project folder. The format of these emails is the following:
[User] has requested to be added to [Project folder], so that they can access [Entry or entity]. To grant access, add them as a collaborator on the project, add them to a team that already has access, or move the item to a project that they already have access to."
As the message states, if it is a user that should be on your (Benchling) Team, ask a Team admin to add them via the Team page. If that is not the case, you can grant them individual permission through the Manage access menu.
Browsing data
There are two main ways to browse through Benchling entries and entities:
Within a Project, you can use the search bar to find contents, including items in subfolders.
Through the Global Search, you can browse through all data types in Benchling across all the Projects you have access to.
🎯 Set the data type and add relevant filters first and then, if needed, filter by Project or Subfolder.

Saved searches can come in quite handy when you need to apply the same filters again and again.
ℹ️ TIP
After applying the needed filters, save your Search and link it directly in your ELN entry so you can find relevant entities without leaving your notebook.
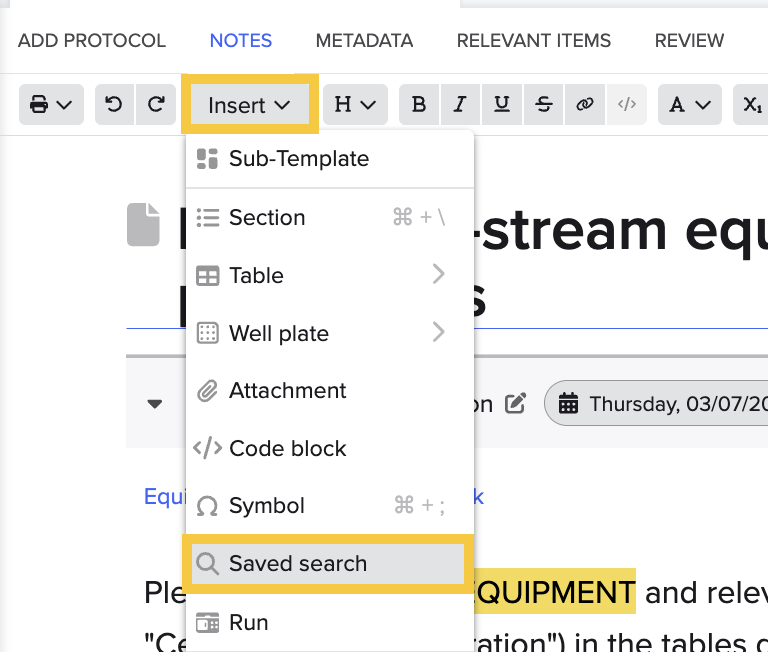
Add a Saved Search as a link in your ELN entry
Use attachments to your advantage
You can attach files to your ELN, with a limit per attachment of 2 GB. While these files are not findable in Benchling through the global search, it may be useful to keep track of which files were generated in a given day.
ℹ️ TIP
Use the “Open preview” button to view attachments directly in the ELN entry.
Maintain collections
While you may create and store plasmid, strain and primer collections externally (for example, in a spreadsheet shared through OneDrive), it is recommended to periodically update them to the Benchling Registry.
You may find the following guides helpful for this purpose:
The end of your Project
As you wrap up a specific study, or you reach the end of your stay at BRIGHT, it’s important to consider the fate of the data you are leaving behind in Benchling.
First, you must consider whether the data in the Projects you have worked on is complete:
Does every entry have a clear purpose and conclusion?
Even if sub-projects were stopped, it is important to take note of this and state why.
Have all relevant entities been registered?
Think of items you would like to leave behind and their locations: strains in -80C freezers, plasmids in -20C freezers.
You may have sequence entities which do not have physical instances (eg. a plasmid that needs to be obtained via miniprep of a strain, or failed constructs). Make sure to clearly label them as such, and to link to other relevant entities when necessary. This may be useful for future users when using the global search and trying to locate sequences.
Is it easy to browse through my project folders?
Make sure your folder structure is well organized. You can always include a README entry to guide others through your folders.
Are there any findings that were not published, but would still be useful to others?
Negative results
Optimized protocols (eg. tricks to improve miniprep yield, how to increase transformation efficiency, or troubleshooting tips for different techniques)
Then, you must make sure people in your team will have access to your data. Share the folder with your team or copy the contents of the project into a folder of the shared team project. Note that the data moved to a new location will have the permission settings of the project folder it is moved into.
Lastly, make sure you still have access to your data while wrapping up. If you’re finishing a project at BRIGHT but still need time to organize or finalize your work in Benchling, you should request temporary extended access through HR. Keep in mind that after your stay ends, access to the BRIGHT Benchling tenant will no longer be available, unless otherwise arranged.
With the previous tips in mind, your experience with the management of projects in Benchling should be as smooth as possible!
If you have any question, don’t hesitate to contact us at lims_support@bright.dtu.dk.