Try out Plate Maps
Benchling plate mapping is a useful tool for planning, visualising and registering your plate experiments:
You can add multiple layers of annotations and values to create a digital record of your plate experiment.
You can insert the resulting map in your ELN and navigate through the different variables in the wells.
You can access or search the plate data stored the inventory.
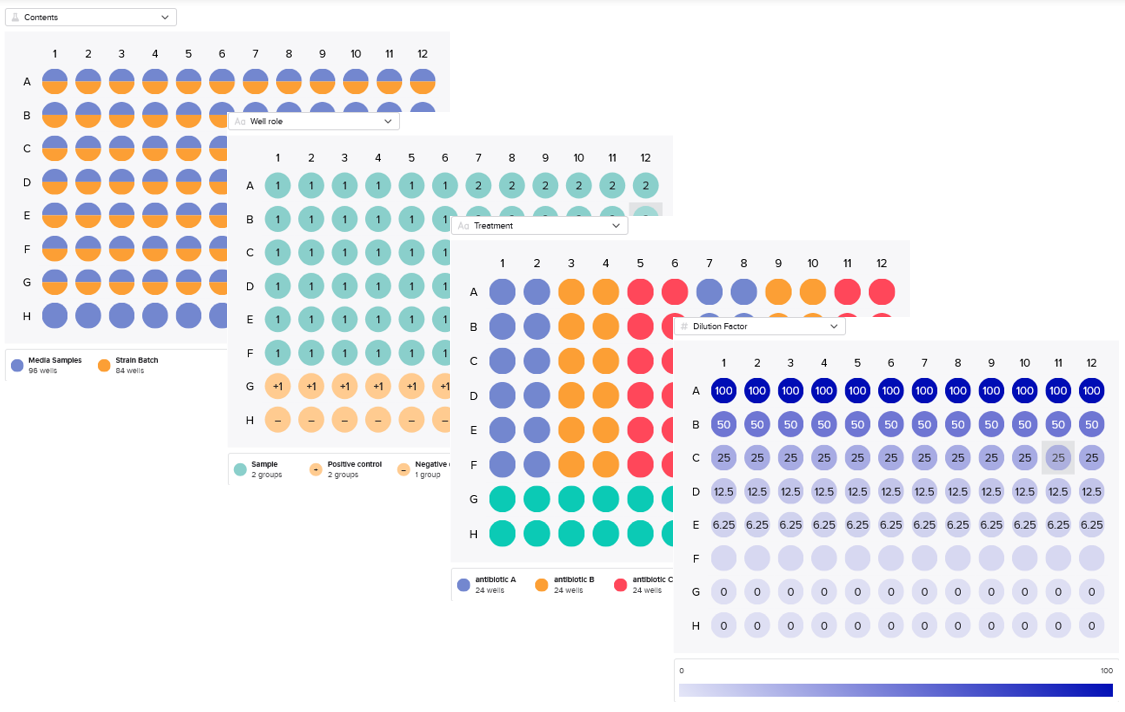
Example of layers of annotations in a plate map
Before starting
Before creating the Plate Map, make sure the contents you want to fill the plate with are registered and containable (see note for list of containable entities). You can also add those entities to a worklist to facilitate filling up the plate in bulk.
List of Containable Entities
List of Benchling entities that are containable - i.e., can be added into containers (Bottle, Cryovial, Well, etc.):
Analytical Submission Sample
Cell Line Batch
Cell Line Design
Commercial Material
DNA Fragment Batch
Strain Batch
Plasmid Batch
Fermentation Culture
Generic Sample / Cell Pellet
gDNA
Medium Prep
Nanopore Sequencing Submission Sample
Primary Cell Batch
Primer
Primer Pair Mix
Protein Batch
Protein Sample
Proteomics Submission Sample
Stem Cell Batch
Timepoint Sample
Get started
Watch the following video to learn how to create and use a Plate Map directly in your Notebook entry.
Summary of the steps:
Create a plate map
To create a plate map, you can insert it into a Notebook entry (as showed in the video), or create it within the Benchling inventory:
Notebook entry > "Insert" > "Plate Map"
or
Benchling Navigation Bar > "Create (+)" > "Plate"
Choose the fixed plate type
Choose between 6-well, 12-well, 24-well, 48-well, 96-well, or 384-well plates. Designate a location in the inventory, or fill other fields for that plate schema.
Annotate the wells in the plate
Select multiple wells at once by dragging the cursor or by using the shift key, or fill wells individually.
Add the well contents from the registry or from your worklist.
Assign roles to the wells: samples, controls, blanks or standards.
Add additional labels with the Well schema fields: Treatment and Dilution Factor.
Specify the concentrations and volumes of your contents
Indicate the values for the contents filling up the plate in your experiment: total well volume, stock concentration, transfer volume and well concentration.
If you have any question, don’t hesitate to contact us at lims_support@bright.dtu.dk.